![]()
Section 14
Bush Handpump InstallationThis section describes how to install Zimbabwe Bush handpumps and pour a cement pump pad. Also, see instructions on how to manufacture Zimbabwe handpumps (Appendix K) and detailed guidelines for working with concrete (Appendix J).
The following tools are needed to install fully manufactured Bush pumps:
|
| Cutting the Well Casing: After the casing has been installed (Section 7), gravel packed (Section 8), and grouted (Section 9), it is typically cut-off 16 inches above the finished pad surface. This distance is much less critical if a casing reinforcement base is used (see Appendix K - Figure 27). |
After cutting the casing, test the well yield to confirm that there is enough water to support a handpump. If there is not, develop the well some more or abandon it. If there is enough water, install the Zimbabwe Bush pump as follows:
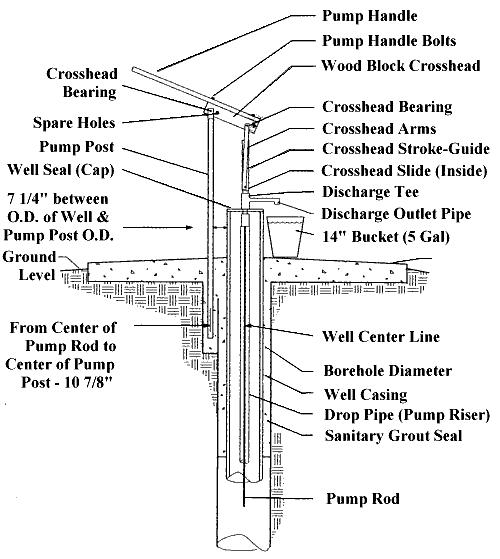
Pump Post Installation: Installing the pump post and the casing reinforcement base is the hardest part of installing Bush pumps because these two parts must be precisely aligned to each other. To install the pump post:
|
Figure 17: Zimbabwe Handpumps Configuration
| Dug Well Installation: It is much more complicated to install Bush / Zimbabwe handpumps on a dug well. One option is to bolt the steel pump post to the outside of the casing and then support it by pouring concrete around it. Make a hole near the edge of the concrete well lid so that the cylinder and rising main (sometimes called "drop pipe", "draw pipe" or "pump column") can be lowered into the well right beside the well tiles. Bolt the casing reinforcement base (Appendix K, Figure 27) to the well lid and then pour concrete around it. Alternatively, the pump could be modified by welding the pump post and casing reinforcement cover onto two horizontal steel bars. The two bars can be bolted to the well lid and then covered in concrete. Installation of the pump cylinder, pump rod and rising main would then be completed as described below. |
Design and Pour the Concrete Pad. After the concrete around the pump post and base has cured for a day, pour the cement pad (see Section 12). While the concrete pad is curing, disinfect the well (see Section 15).
Installation of Pump Cylinder, Pump Rod, and Rising Main: After the pad is cured (7 days and keeping it wet), install the cylinder. Wipe the pump cylinder and rising main with the disinfectant solution prior to installation. Lay-out enough rising main and pump rod (also known as "sucker rod") so that the pump cylinder will be positioned at or above the middle of the screen (see Figure 15 - Section 9). Note, however, the following special cases:
If very fine sand is present in the water, the cylinder should be positioned 1-2 meters above the screen to minimize sand pumping;
| If the only available water bearing formation is a shallow unconfined aquifer or if the well has a low yield, the pump may produce water for a little while before sputtering dry only to work again an hour later. If this is the case, ensure that the pump cylinder is placed as close to the bottom of the well as possible (within 61 cm). Alternatively, a 10 m length of one-inch diameter PVC pipe could be attached to the pump cylinder and a one-way valve added to the bottom end. The pump cylinder should then be installed above the screen with the suction line dropping into the casing below the screen. Since the suction limit is 8.5 m, this will limit the maximum pumping rate and will prevent the well from being rapidly pumped dry. If an existing well starts sputtering dry, there are a few other things you can try (see Appendix G). |
Glue one male and one female threaded coupler to the ends of each length of rising main. Ensure that you follow proper proceedures for joining PVC pipe to prevent pipe from separating once it is in the well (see Section 7).
| Take apart the pump cylinder and make sure the piston rod is tightly connected to the piston. This is done by tightening one nut. Also make sure that all fittings on the piston are secure... THEY ARE OFTEN NOT TIGHTENED AT THE FACTORY!. If you ever come upon a pump where there is water in the well and the handle moves very easily up and down but no water comes out the spout, the fittings inside the cylinder and/or the pump rod connections have come undone! |
Put one length of steel rod inside one length of plastic drop tube. The steel rod should be threaded on both ends. The drop tube should have threaded fittings so that it can be taken apart when the cylinder has to be removed for maintenance.
| If you ever come upon a pump where the handle is very hard to push down and it "snaps" back up without producing water, the threaded fittings have come unscrewed or the glue holding the fitting onto the rising main has let go. If the rising main separates, the water-filled rising main and the attached cylinder will slide down inside the well until they are stopped by the piston striking the top of the cylinder. Each time you push the pump handle down, the pump rod will lift the cylinder and the water-filled rising main. It doesn't take long before the pumphead breaks or the pump rod separates and the rising main and cylinder drop to the bottom of the well!!! |
Connect the steel rod to the piston rod of the cylinder using a threaded steel coupling. TIGHTEN FIRMLY!
Disinfect a long nylon rope with a mild chlorine solution and attach one end to the rising main several feet above the pump cylinder. Connect the other end to the inside of the well casing just below the top of the well. This safety rope will ensure that the cylinder and the rising main can be retrieved if accidently dropped during removal (see Section 17: Bush / Zimbabwe Handpumps Maintenance).
Connect the rising main to the pump cylinder. Make sure the rising main section joints are at the same location as the pump rod joints. If possible, make rubber or metal centralizers and install them every 6.10 - 12.19 m (20 - 40 ft) to keep the rising main centered within the casing (this minimizes the amount of wear caused by pump rod rubbing against the rising main).
Lower the cylinder with attached rope, rising main and pump rod into the well. Be sure to grip the pipe with a pre-made slip clamp so that it can not fall down the well. Ensure the clamp is larger than the diameter of the well casing so that it can not fall into the well.
Place the next length of pump rod into the next length of rising main and raise them up vertically. Have a helper hold the rising main several feet in the air and firmly connect the pump rod to the rod already in the well. Then connect the rising main.
Carefully lower the pipe until it can be clamped at the coupling for the next pipe and pump rod. Continue the process until all the pipe and rods are installed and the cylinder is at the correct depth.
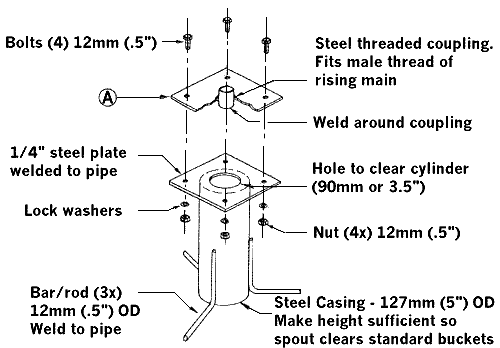
Cut the rising main level with the casing and glue on a male threaded glue-screw fitting. Put the threaded fitting through the hole in the base plate and screw the pump spout on to it. Ensure that you follow proper proceedures for joining PVC pipe (see Section 7.5). Mount the spout and the expansion pipe assembly to the base plate, install it on the pump base and secure it with four 1/2 inch bolts.
|
After you have inserted the pump rod through the hole at the top of the pump sleeve (see Appendix K - Figure 26), adjust the length of pump rod as follows:
|
The pump is now fully installed and may be pumped until the water comes to the surface. Continue to pump until the water clears up. The well should then be chlorinated prior to use. While the well is being chlorinated, the entire pump assembly can be painted. Test the water for bacteria (Section 16) and repeat the disinfecting procedure if necessary.